Once you downloaded the extension you can install it.
Installation
"ARI Smart Content" uses standard Joomla! installation procedure. The tutorial on how to install Joomla! extensions can be found here. "System - ARI Smart Content" and "System - ARI Extensions" plugins will be installed automatically during the installation of the component. Don't uninstall or disable these extensions because they are required for the correct operation of the component and extension's addons. When the component is installed, the page with available addons for the extensions will be shown. You can select what extension(s) do you want to install (upgrade) and complete installation process clicking by "Complete" button. The installed plugins are disabled by default so if you want to use a plugin from "ARI Smart Content", configure and enable it before on "Extensions → Plugin Manager" page on Joomla! backend.
If a error occurs when try to install the extension using "Upload package file" tab on "Extension Manager: Install" page, it can be a problem with file size limit for uploaded files. This limit is defined in PHP settings, open "System → System Information → PHP Information" page on Joomla! backend to check value of upload_max_filesize PHP parameter:

If value of the parameter is less than 4M then try to increase. It can be done in the several ways:
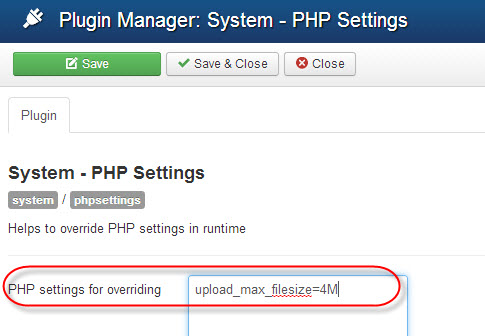
One note, if ability to change values of PHP parameters is disabled on your hosting, this method will not work.
If it is not possible to increase value of upload_max_filesize parameter no your server then the extension can be installed using "Install from Directory" tab on "Extension Manager: Install" page. For this unzip com_arismartcontent.zip archive to a folder on your server, e.g. /home/upload/install/com_arismartcontent folder. You can upload the archive by FTP or using file manager from hosting panel (for example cPanel supports this ability) and then unzipped the archive in hosting panel or unzipped the archive on your local PC and then upload unzipped files to your server by FTP. After this open "Install from Directory" tab on "Extension → Extension Manager → Install" page on Joomla! backend, enter path to the folder on your server with unzipped component to "Install directory" field and click "Install" button.
Upgrade
Upgrade process doesn't require to uninstall previous version of the extension. Just install new version of "ARI Smart Content" over installed one through standard Joomla! installation page and the installer of the extension does all necessary changes.
Note: We recommend to create a backup of Joomla! database prior upgrade the extension to have ability to restore data if an error occurs. The backup can be created with help of AkeebaBackup extension.
Uninstall
The extension uses standard Joomla! uninstall routine. The tutorial on how to uninstall Joomla! extensions is here. By default the component doesn't delete database tables and the installed addons for the extension from Joomla! system. If you want to remove them, set Complete uninstall config parameter to "Yes".