Introduction
This Joomla! add-on brings ability to show different content into a popup. It aims to best performance and provides a user-friendly interface.
Images, YouTube and Vimeo videos, external pages, inline content and Joomla! articles can be shown into the lightbox.
Install extension's package to start working with the software. System - ARI Magnific Popup plugin and other add-ons will be installed.
This plugin does all magic to add lightbox effect. It supports ability to automatically convert existing links and images or add popup into a content via shortcodes.
Button - ARI Magnific Popup plugin adds a button to editors which helps to generate and insert shortcodes.
The features which are available only in "Pro" version are marked with badge.
Installation
Installation of the extension is an easy process:
- Download pkg_arimagnificpopup.zip here or pkg_arimagnificpopup_pro.zip archive in Member Area on our site for "Pro" version.
- Login to your Joomla! backend and open "Extensions → Manager → Install" page.
- Select the downloaded file in "Upload Package File → Extensions package file" parameter and click "Upload & Install" button.
- The following add-on will be installed:
- System - ARI Magnific Popup plugin. It is a main addon which does all magic :)
- Button - ARI Magnific Popup plugin. This plugin adds a button to an editor which helps to generate and insert shortcodes for the extension.
- Open "Extensions → Plugins" page on Joomla! backend, find "System - ARI Magnific Popup" plugin and open plugin settings page. Configure plugin's parameters and save settings.
- That's all. Now you can start to enjoy "ARI Magnific Popup" :)
Update
If want to update the extension, follow the steps from Installation section.Upgrade to "Pro" version
If you like a free version, but need more features and want to upgrade it to "Pro" version just install "ARI Magnific Popup Pro" over "ARI Magnific Popup" extension. All shortcodes and auto conversion from free version will work fine in "Pro" version.System requirements
The extension is compatible with Joomla! 3.4+ and works in all modern browsers."Button - ARI Magnific Popup" plugin
This plugin is added and enabled automatically when extension's package is installed. It adds a button to editors which helps to create and insert shortcodes for System - ARI Magnific Popup plugin.
We are recommend to use this plugin when possible because it provides a fast and a convenient way to add a popup to content and helps to avoid mistakes in shortcodes' syntax.
The button looks like , but it can vary depending on what editor is used on your site. Possible variants on the screenshors below:


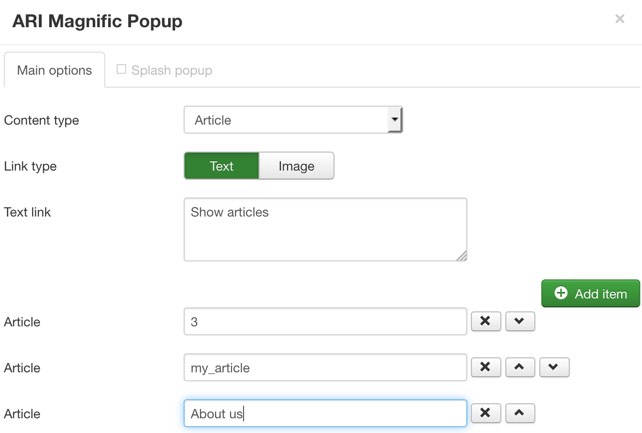
Set the cursor in editor's textarea where you want to place a link (a content) which will trigger the popup and click by "Popup" button. A popup with configuration parameters appears.
Use "Content type" drop-down to select a content type which want to show into the popup. Possible to show the following content types:
- Articles is used to show Joomla! articles into the popup.
- Inline content is used to show some text (any HTML code) into the popup.
- URL is used to show some text (any HTML code) into the popup.
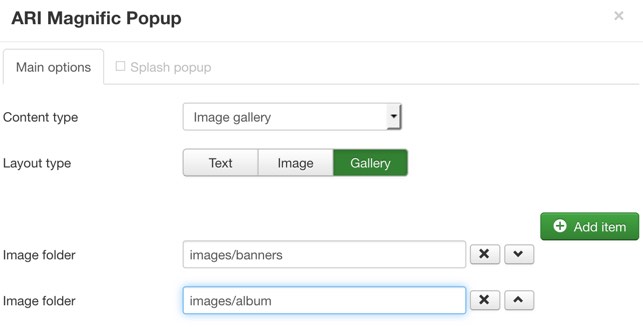
- Image gallery is used to create a gallery for images from the selected folder(s) and open original images into the popup.
- YouTube is used to show YouTube videos into the popup.
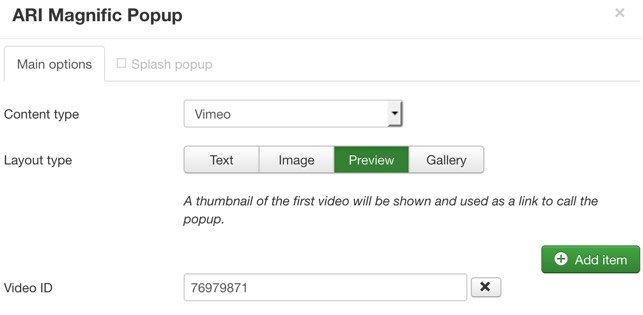
- Vimeo is used to show Vimeo videos into the popup.
Click "Insert code" button to insert a shortcode into content when configure all parameters.
Articles
Use "Article" parameter to specify article(s) which will be shown into the lightbox. It is possible to enter article ID, title or alias.
If want to show several articles, use "Add item" button to add more "Article" fields. The lightbox will show next/prev buttons to navigate between articles.
"Link type" parameter is used to select type of the link which will trigger the lightbox. It can be a text link or an image.
Depends on link type enter a text in "Text link" textarea or select an image in "Image link" parameter.
Inline content
"Content" parameter is used to specify a text (any HTML code is supported) which will be shown into the popup. "Link type" parameter is used to select type of the link which will trigger the lightbox. It can be a text link or an image.
Depends on link type enter a text in "Text link" textarea or select an image in "Image link" parameter.
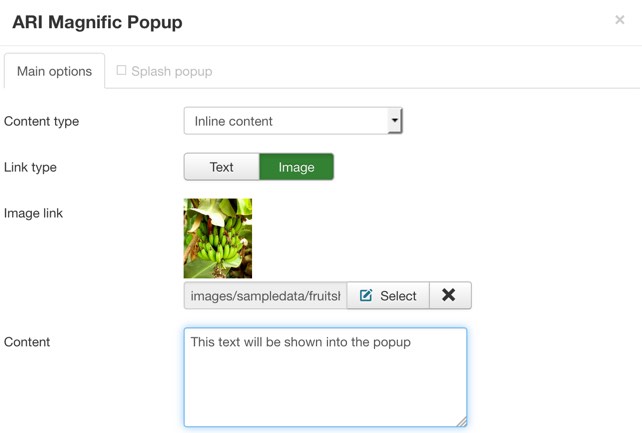
Image gallery
The extension will show images from folder(s) which are defined in "Image folder" parameter. If want to show images from several folders, use "Add item" button to add more "Image folder" fields.
Specify a relative path which starts from joomla root directory. For example populate the parameter with images/my_album value to show images from [joomla_directory]/images/my_album folder.
If "Layout type" parameter is set to Gallery, thumbnails for selected images will be shown on a page and original images will be shown into the popup.
If the parameter is set to Text or Image value, a text link or an image will trigger the popup with images. Depends on value of the parameter enter a text in "Text link" textarea or select an image in "Image link" parameter.
Vimeo videos
It will show videos which IDs are defined in "Video ID" parameter. If need to show several videos, use "Add item" button to add more "Video ID" fields.
Specify a Vimeo video ID. For example populate the parameter with 76979871 value.
If "Layout type" parameter is set to Gallery, thumbnails for the selected videos will be shown on a page and videos will be shown into the popup.
If this parameter is set to Preview, a thumbnail for the first video will be shown on a page and it will trigger the popup with videos.
If the parameter is set to Text or Image value, a text link or an image will trigger the popup. Depends on value of the parameter enter a text in "Text link" textarea or select an image in "Image link" parameter.
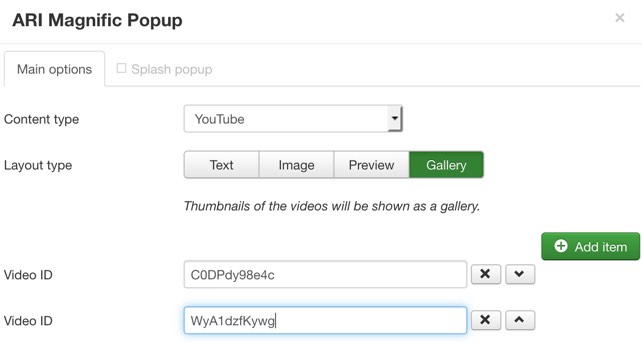
YouTube videos
It will show videos which IDs are defined in "Video ID" parameter. If need to show several videos, use "Add item" button to add more "Video ID" fields.
Specify a YouTube video ID. For example populate the parameter with C0DPdy98e4c value.
If "Layout type" parameter is set to Gallery, thumbnails for the selected videos will be shown on a page and videos will be shown into the popup.
If this parameter is set to Preview, a thumbnail for the first video will be shown on a page and it will trigger the popup with videos.
If the parameter is set to Text or Image value, a text link or an image will trigger the popup. Depends on value of the parameter enter a text in "Text link" textarea or select an image in "Image link" parameter.
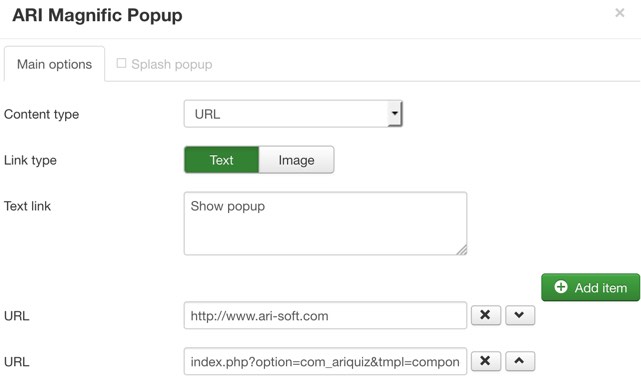
URL
Use "URL" parameter to specify URL(s) of pages which want to show into the lightbox.
If want to show several pages, use "Add item" button to add more "URL" fields. The lightbox will show next/prev buttons to navigate between pages.
"Link type" parameter is used to select type of the link which will trigger the lightbox. It can be a text link or an image.
Depends on link type enter a text in "Text link" textarea or select an image in "Image link" parameter.
Splash popup
Use it to open the popup automatically on page load. Content which is defined on "Main options" tab will be shown. If want to enable this option, open "Splash popup" tab and set "Enabled" parameter to "Yes":
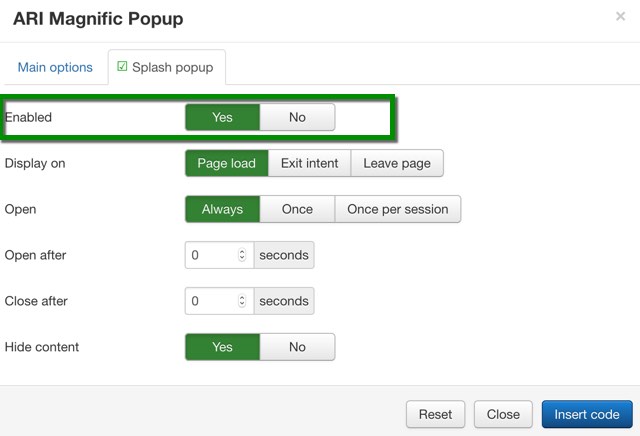
Descriptions of other parameters from "Splash popup":
- Open is used to specify should the popup be opened each time when a page is loaded (leave, exit intent) or not. When the parameter is set to Always value, the popup will be opened each time. If it is set to Once value, the popup will appear only once and it will not be shown when the page is loaded next time. If value of the parameter is Once per session, the popup will be shown again when browser's is closed and opened again.
- Display on is used to specify when the popup should be shown. It is possible to show popup when page is loaded, on exit intent or when try to leave a page.
- Open after is used to specify period of time in seconds after what the popup will be shown. If value of the parameter is 0, the popup will be shown immediately when a page is loaded.
- Close after is used to specify period of time in seconds after what the popup will be closed automatically. If it is set to 0, the popup will not be closed automatically and a user should close it manually.
- Hide content is used to show/hide links which trigger the popup. Set it to "No" if want to show link(s) on a page which will trigger the popup when a user clicks on them.
"System - ARI Magnific Popup" plugin
The plugin provides ability to use shortcodes to add the popup and add lightbox effect to existing links and images automatically. Don't forget to configure the plugin according to your needs. A link to plugin settings page can be found on "Extensions → Plugins" page on backend part of your site after installation.
Shortcodes
The popup is added into content via a shortcode. Shortcode looks like:
{popup ...some attributes...}... some content ...{/popup}
popup is shortcode tag name, {popup} is shortcode open tag and {/popup} is shortcode close tag. Attributes can be added to open tag. They are added as key="value", for example the following shortcode contains gallery and layout attributes:
{popup gallery="images/album" layout="gallery"}Click me{/popup}
Add a shortcode into content in place where you want to show a link (gallery) which will trigger the popup.
Shortcodes: article
It is possible to specify Joomla! article(s) ID, alias or title and they will be shown into the popup. Use article attribute for this. Separate each article ID by semicolon. Place content of the link which will trigger the popup between {popup} and {/popup} tags:
{popup article="3;about_us;Our team"}Click me{/popup}
Shortcodes: inline content
If want to show some content into the popup, it doesn't require any additional attributes for {popup} tag. {link} and {content} tags are used for this purpose.
Place content of the link which will trigger the popup between {link} and {/link} tags and content which want to show between {content} and {/content} tags. For example:
{popup}{link}Click me{/link}{content}Hello! I'm "ARI Magnific Popup" extension.{/content}{/popup}
Shortcodes: image gallery
Specify path to folders with images in gallery attribute. Images from the specified folders will be shown into the popup. Separate each path to a folder by semicolon. For example:
{popup gallery="images/nature;images/banners"}Open gallery{/popup}
If want to show thumbnails of images on a page and open original images into the popup, add layout="gallery" attribute:
{popup gallery="images/nature;images/banners" layout="gallery"}{/popup}
Shortcodes: Vimeo videos
Specify IDs of Vimeo videos in vimeo attribute. Separate each ID by space. For example:
{popup vimeo="76979871 76979871"}Open Vimeo video{/popup}
If want to show thumbnail of the first video on a page and open videos into the popup, add layout="preview" attribute:
{popup vimeo="76979871 76979871" layout="preview"}{/popup}
If want to show thumbnails of videos on a page and open videos into the popup, add layout="gallery" attribute:
{popup vimeo="76979871 76979871" layout="gallery"}{/popup}
Shortcodes: YouTube videos
Specify IDs of YouTube videos in youtube attribute. Separate each ID by space. For example:
{popup youtube="C0DPdy98e4c WyA1dzfKywg"}Open YouTube video{/popup}
If want to show thumbnail of the first video on a page and open videos into the popup, add layout="preview" attribute:
{popup youtube="C0DPdy98e4c WyA1dzfKywg" layout="preview"}{/popup}
If want to show thumbnails of videos on a page and open videos into the popup, add layout="gallery" attribute:
{popup youtube="C0DPdy98e4c WyA1dzfKywg" layout="gallery"}{/popup}
Shortcodes: URL
Use url attribute to specify links which want to open into the popup. Separate links by semicolon. For example:
{popup url="http://www.ari-soft.com;mypage.html"}Click me{/popup}
Shortcodes: splash popup
Add splash="1" attribute if want to show a splash window:
{popup splash="1"}{content}Hello!{/content}{/popup}
splash_on attribute is used to specify when the popup should be shown: on page load, exit intent or when page is leaving. Possible values: pageLoad, exitIntent, pageLeave. The following code shows the popup on exit intent:
{popup splash="1" splash_on="exitIntent"}{content}Today we offer special discount for you!{/content}{/popup}
splash_timeout attribute is used to specify period of time in seconds after what the splash window will be shown. The following code shows the splash window after 10 seconds when page is loaded:
{popup splash="1" splash_timeout="10"}{content}Hello!{/content}{/popup}
splash_autoClose attribute is used to specify period of time in seconds after what the splash window will be closed automatically. The following code closes it after 30 seconds:
{popup splash="1" splash_autoClose="30"}{content}Hello!{/content}{/popup}
Use splash_show parameter if want to show the splash window only once or once per browser's session. It also require to specify an unique key in splash_key attribute.
If want to open the popup only once, set splash_show attribute to once value or set it to once_session value if want to set only once per browser's session:
{popup splash="1" splash_show="once" splash_key="welcome"}{content}Hello!{/content}{/popup}
Plugin parameters
Parameters are separated by groups on plugin settings page. Use tabs at the top of the page to navigate between the following parameter groups:
- Plugin contains parameters which are used to control auto conversion of existing links and images.
- Popup settings contains parameters which are used to configure look & feel of the popup (transition effects, slideshow mode and etc.).
- Layout settings is used to configure gallery parameters. Gallery is used when show thumbnails of images or videos.
- Types settings tab. The extension can show different content (images, inline content, videos and etc.) and this parameters section is used to configure some specific parameters of the selected content type (thumbnails size, description file and etc.).
- Advanced contains some advanced parameters. In most cases default values of these parameters should be suitable, but they can be changed if need to resolve some conflicts with 3rd party extensions. It also contains parameters which are used to convert file names to titles.
{popup url="http://www.ari-soft.com" fxOpen="3d-unfold"}{/popup}
Popup settings
The following parameters can be configured on "Popup settings" tab.| Parameter | Shortcode attribute | Description |
|---|---|---|
| Align |
alignTop
Values: 0 or 1 |
Use it to define popup alignment. If set to 'Top' popup is aligned to top instead of to center. |
| Close on [ESC] |
escape
Values: 0 or 1 |
Controls whether pressing the escape key will dismiss the active popup or not. |
| Close on BG click |
closeOnBgClick
Values: 0 or 1 |
Close the popup when user clicks on the dark overlay. |
| Show close button |
showCloseBtn
Values: 0 or 1 |
Controls whether the close button will be displayed or not. |
| Open effect |
fxOpen
Values: 3d-unfold, move-from-top, move-horizontal, newspaper, zoom-in, zoom-out Set to an empty value to disable effect. |
Choose an animation effect which will be used when the popup appears. |
| Close effect |
fxClose
Values: 3d-unfold, move-from-top, move-horizontal, newspaper, zoom-in, zoom-out Set to an empty value to disable effect. |
Choose an animation effect which will be used when the popup disappears. |
Slideshow parameters
It is possible to enable slideshow for images. Parameters from this section is used to configure slideshow.| Parameter | Shortcode attribute | Description |
|---|---|---|
| Pause duration |
slideshowPause
Values: a number. |
After the specified duration in milliseconds, the next item will be shown. |
| Auto play |
slideshowAuto
Values: 0 or 1. |
If the parameter is enabled, slideshow will be started automatically when the popup is opened. |
| Endless |
slideshowEndless
Values: 0 or 1. |
If the parameter is disabled, slideshow will be stopped when it is reached the last item otherwise it will jump to the first item and continue working. |
| Show meter |
slideshowMeter
Values: 0 or 1. |
If the parameter is enabled, a progress bar will be shown. It indicates when the next item will be shown. |
| Play button |
slideshowPlayBtn
Values: a string. |
Specify template for play button. |
| Pause button |
slideshowPauseBtn
Values: a string. |
Specify template for pause button. |
Mobile settings
It is possible to disable popup on mobile devices.| Parameter | Shortcode attribute | Description |
|---|---|---|
| Disable on mobile |
mobileDisable
Values: 0 or 1. |
If the parameter is enabled, the popup will be disabled on small screens and content will be opened in a browser window. |
| Breakpoint width |
mobileWidth
Values: a number. |
This parameter is used when 'Disable on mobile' parameter is set to 'Yes'. In this case when width of browser's window less than the defined value in pixels, links will be opened directly into a browser instead of popup. |
Retina images
It is possible to disable popup on mobile devices.| Parameter | Shortcode attribute | Description |
|---|---|---|
| Enabled |
retina
Values: 0 or 1. |
If the parameter is enabled, the extension will allow to display high-resolution images on high-dpi screens with different devicePixelRatio. Module works only with 'image' type and only when window.devicePixelRatio > 1. First of prepare two sets of images. It requires @2x at the end of the image file name, e.g.: image.jpg > image@2x.jpg |
| Ratio |
retinaRatio
Values: a number. |
Image in popup will be scaled down by this number. |
Layout settings
The following parameters can be configured on "Layout settings" tab.| Parameter | Shortcode attribute | Description |
|---|---|---|
| CSS class(es) |
galleryClass
Values: a string. |
The specified CSS class(es) will be added to gallery container element. It is useful to change style of the gallery and add some CSS properties for gallery elements. |
ImagesDefine how to process images |
||
| Lazy load |
lazyLoad
Values: 0 or 1. |
If the option is enabled, images in gallery will be lazy loaded. It means images will be loaded only when a page with images are opened. It increases speed of page loading. |
StylesSpecify which styles and effects add to images in gallery |
||
| Show frame |
galleryFrame
Values: 0 or 1. |
Show or hide frame around images. |
| Hover effect |
galleryHover
Values: blur, focus, grayscale, morph, sepia, zoom-in, zoom-out Set to an empty value to disable effect. |
Select effect which will be applied to images when a mouse cursor moves over them. |
PagingUse parameter from this section to enable paging and configure parameters like page size, start page and etc. |
||
| Enabled |
paging
Values: 0 or 1. |
If it is enabled, images in the gallery will be separated by pages. It provides more convenient navigation for galleries with a lot of images. |
| Paging position |
pagingPos
Values: bottom, top, both. |
Specify position(s) where a paging control will be shown. |
| Start page # |
paging
Values: a number. Use 1 for the first page, 2 for the second page and etc. |
Specify number of a page which will be opened when a gallery is loaded. Use 1 for the first page, 2 for the second page and etc. |
| Paging options | - | It is used to specify data which will be used to populate drop-down where page size can be selected. Use 'Page size' parameter to specify possible number of items which will be shown per page, 'Label' parameter to specify which text will be shown in the drop-down for the defined 'Page size' value. Use 'Default' radio button to select page size by default. |
Types settings
Configure some default parameters for the following content types on "Types settings" tab.Image gallery
This section contains parameters which are used when extension shows images from the selected folders.| Parameter | Shortcode attribute | Description |
|---|---|---|
| Slideshow enabled |
slideshow
Values: 0 or 1. |
When the parameter is enabled, it will be possible to enable slideshow mode in the popup. |
Data parametersThe following parameters are used to define how to sort and filter selected images, where get description. |
||
| File filter |
fileFilter
Values: a regular expression. |
The extension will select only images which are matched to the defined regular expression. Don't change this parameter if not sure how to use it. By default it selects all .jpg,.jpeg,.gif,.png,.bmp images and ignore retina images (with @2x postfix). |
| Scan sub-folders |
subdir
Values: 0 or 1. |
If the parameter is set to 'Yes', images will be selected from sub-folders of the selected folders. |
| Sort by |
sortBy
Values: filename, modified, csv, random Set to an empty value to disable sorting. |
Images will be sorted by the selected field. |
| Sort direction |
sortDir
Values: asc, desc |
Specify sort direction. |
| Data file |
metaFile
Values: a file name. |
Specify name of CSV file which will be used to define titles and descriptions for the images. Specify only file name (without folder and sub-folders). The file should be located in a folder with images. Each folder and sub-folder should contain own data file.
The file should contain "File" and "Title" fields, place image file names in "File" column and titles in "Title" column. Content of the sample CSV file below:
File,Title
|
Thumbnail parametersThe following parameters are used to generate thumbnails. |
||
| Create thumbnails |
thumb
Values: 0 or 1. |
If the parameter is enabled, the extension will generate thumbnails automatically for preview images (which are shown in the gallery). Original images will be shown in the popup and a user clicks by a thumbnail. |
| Thumbnail width |
thumbWidth
Values: a number. |
The extension will create thumbnails with the defined width. If the parameter is empty, it will be calculated automatically based on value of 'Thumbnail height' parameter to save aspect ratio of images. |
| Thumbnail height |
thumbHeight
Values: a number. |
The extension will create thumbnails with the defined height. If the parameter is empty, it will be calculated automatically based on value of 'Thumbnail width' parameter to save aspect ratio of images. |
YouTube
This section contains parameters which are used when extension shows YouTube videos.| Parameter | Shortcode attribute | Description |
|---|---|---|
| Thumbnail size |
ytThumb
Values:
|
Specify what images retrieve from YouTube service as thumbnails for videos. |
Advanced
It contains some advanced parameters which can help if need to resolve some conflicts with 3rd party extensions. It also contains parameters which are used to convert file names to titles.| Parameter | Shortcode attribute | Description |
|---|---|---|
| Shortcode tag | - | Specify a word which will be used as a tag for extension's shortcode. Change default tag if another extension uses the same tag to avoid conflicts. |
| Include jQuery | - | Indicate should the module load jQuery library or not. |
| jQuery noConflict | - | Indicate should the module call jQuery.noConflict() method or not. It can be required if you use not jQuery javascript library on your site, for example MooTools, to avoid conflicts. |
| Custom styles | - |
CSS styles which are defined in the parameter will be included on all pages where the extension is used. Can use any valid CSS rules. For example add the following CSS code if want to add border around remote content into the popup: .mfp-iframe-holder .mfp-content .mfp-iframe-scaler {border: 10px solid #FFF;} |
Convert file names to titlesIt is used to convert files names to titles. |
||
| Enabled |
autoConvert
Values: 0 or 1. |
If this parameter is enabled, the extension will use image file names as titles if title is not specified in data file. |
| Transform text |
autoConvertType
Values:
|
Specify how to transform the extracted titles (to upper case, lower case or in another way). |
| Transform template |
autoConvertTemplate
Values: a string. Use {$baseFileName} predefined variable in a template. It will be replaced with file name without file extension. It can be transformed with help of filters. Filter name are defined at the end of variable name (previous filter) and separated by | symbol. Some filter can accept parameters and they are separated by : symbol. For example the following template is used to apply upper_case filter and transform value of {$baseFileName} variable to uppercase: {$baseFileName|upper_case}
Yes is replaced with No and then all characters are transformed to lower case in the sample below: {$baseFileName|replace:Yes:No|lower_case}
The following filters are supported:
|
Define template which will be used to prepare the extracted titles. It is possible to use {$baseFileName} predefined variable which will be replaced with file name without file extension. |
Auto convert links and images
The extension can add lightbox effect to existing links and images automatically. It just require to configure parameters on "Plugin" tab on "System - ARI Magnific Popup" plugin settings page. The following auto conversions are supported:
Auto convert links by CSS class names
If you want to open HTML hyperlinks with specific CSS classs name(s) in the popup, see "Transform existing links → By CSS class(es)" parameters section.
Set "Enabled" parameter to "Yes" and specify CSS class name(s) in "CSS class(es) → Class name" parameter.
For example if want to open all links with modal CSS class name (like <a href="page.html" class="modal some_class">Open link</a>) into the popup,
populate "CSS class(es) → Class name" parameter with modal value.
If need to convert links which contains two or more CSS classes together, specify class names separated by spaces.
For example if want to open in the popup all links which contains mylink and external CSS classes together (e.g. <a href="page.html" class="some_class mylink external">Open link</a>),
populate the parameter with mylink external value:

Auto convert links with target="_blank" attribute
If you want to open HTML hyperlinks with target="_blank" attribute (e.g. <a href="page.html" target="_blank">Click me</a>) into the popup, see "Transform existing links → With target='_blank' attribute" parameters section.
Set "Enabled" parameter to "Yes".
Set "Internal links" parameter to "Yes" if want to open internal links (links from your site) with target="_blank" into the popup.
Set "External links" parameter to "Yes" if want to open external links (links from another sites) with target="_blank" into the popup.
Auto convert external links
If you want to open all HTML hyperlinks for remote links (links from not of your site), see "Transform existing links → External links" parameters section. Set "Enabled" parameter to "Yes".
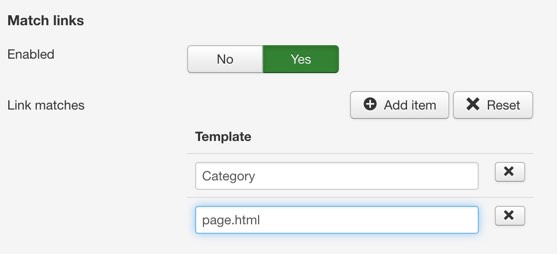
Auto convert links with matched URLs
If you want to open HTML hyperlinks with URLs which are matched to the defined templates, see "Transform existing links → Match links" parameters section.
Set "Enabled" parameter to "Yes" and specify template(s) in "Link matches → Template" parameter. The extension will convert all links which contains a string which is defined in "Template" parameter.
For example if want to convert all links which contains Category and page.html strings (domain.com/Category/News/list.html, domain.com/page.html?id=45 will match to these templates), populate "Template" parameter with these values:
Auto convert images
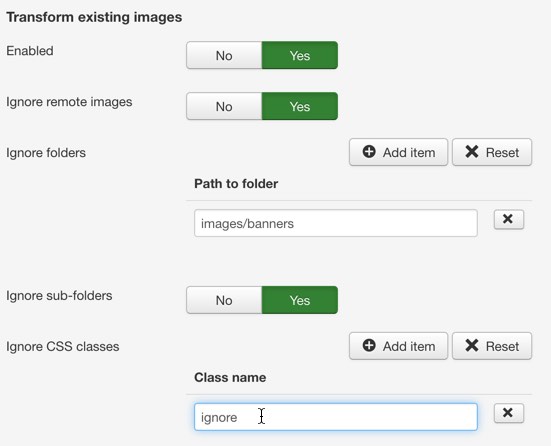
See "Transform existing images" parameters section if want to add lightbox effect to existing images. It will create thumbnails for all images which are matched to the defined parameters and open original images into the popup.
Set "Enabled" parameter to "Yes" to enable this feature.
The extension process only images which contains "width" and/or "height" attributes (or CSS properties) which are differ from original image size. For example it will process <img src="images/photo.jpg" width="100" /> or <img src="images/photo.jpg" style="width:100px;" /> images if real image width is not 100 pixels (for example 300).
In this case it creates a thumbnail with 100 pixels width and it will be shown on your site instead of original image. Original images will be shown into the popup when click by the thumbnail.
Use "Ignore folder" parameter if necessary to not process images from some folders. Populate the parameter with relative path(s) to these folders. For example if want to ignore images from [joomla_folder]/images/banners folder, populate the parameter with images/banners value. If want to also ignore images from sub-folders of the specified folders, set "Ignore sub-folders" parameter to "Yes".
Use "Ignore CSS classes" parameter to ignore images with specific CSS class(es). For example if want to ignore images with ignore CSS class name (e.g.
<img src="album/photo.jpg" class="border ignore" />), populate the parameter with ignore value.
Video tutorial
See a video tutorial on how to use "ARI Magnific Popup" extension: